 As you can probably tell I'm obsesses with baking right now... I thought I found my niche but then the Great Pumpkin Disaster happened. *sigh* But then! A revelation! At work we took personality assessments and it clicked... I'm not a great combo for baking - low patience but high detail... well.. I'm going to my self-awareness to work!
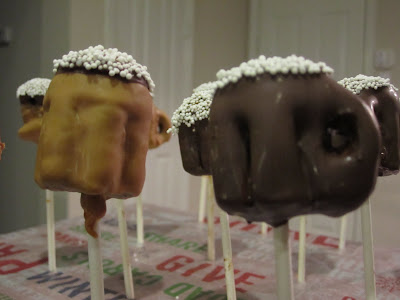
The hubster and I have a lot of fun friends... this year we were invited to several themed holiday parties... one being Booze-a-Palooza. Well who am I not to contribute? I decided to get created with Bakerella's cake pops and make little beer mugs. Learning from my previous mistake of adding too much frosting (this is when I attempted to make longhorn shaped cake pops for the UT/OU game... that disaster was more of a defeat which is why I didn't share).. I took leftover cupcakes and crumbled all but 3 in my food processor. This way, if I've added in too much frosting, no biggie, I had cake reserved to help balance it out.
TIP: The consistency of your cake should feel like dough... For 1/2 a 9 x 13 cake, I use about a 1/4 of the container of frosting.
 After I made my "dough" I used a cookie dough scoop to make 25 equal shaped balls. I pushed them through a one inch flower shape cookie cutter and kept the top part round. That would eventually be the "beer foam" part of beer mug cake balls.
Day Two: I got a bunch of chocolate covered pretzels as a gift at a holiday party, so I just used though. Using a knife, I "sawed" the curved part of the pretzel to be the handles on the "beer mugs." I glued them on using Wilton peanut butter flavor candy melts. You just need about 5-6 discs for this step. If you are planning on coating them, then melt more.

Day 3: Dipping... so when in my first attempt at cake balls this is when this fell apart (literally). So I wanted to go very slow. I decided to make two flavors of cake balls - Wilton peanut butter candy melts as "golden ale" and Wilton dark chocolate candy melts as "Guiness." Before dealing with melting the chocolate, move the cake balls from the freezer to the fridge. 
Take out 2-3 cake balls from the fridge, leaving the rest, take your stick, and dip it in the chocolate, insert it into the mug (make sure you don't push all the way through!) Wait about 15-20 seconds for chocolate melt to harden.
 Now for the "beer foam" on top I used Wilton candy sprinkles in white. Along the theme of Booze-a-Palooza, I actually found that a shot glass was the perfect height and had the best diameter for dipping my beer mugs into the sprinkles without making a mess.

Day 3: Dipping... so when in my first attempt at cake balls this is when this fell apart (literally). So I wanted to go very slow. I decided to make two flavors of cake balls - Wilton peanut butter candy melts as "golden ale" and Wilton dark chocolate candy melts as "Guiness." Before dealing with melting the chocolate, move the cake balls from the freezer to the fridge.
Reading a ton of reviews online, here's how I melted the chocolate for a smooth consistency:
(I use about 8-10 oz and a pretty shallow bowl)
1. Place candy melts in a microwave friendly glass bowl (I heart Pyrex)
2. Defrost the candy melts for about 30 seconds, stir and then defrost for another 30 seconds
3. Add in about 1 tsp of vegetable shortening OR, if you have it, 1 tsp of paramont crystals
4. Melt in the microwave for 15 seconds, stir, 15 seconds, stir, etc... until smooth
5. Place the glass bowl over boiling water (as a double boiler)... turn off if it starts getting too hot

Take out 2-3 cake balls from the fridge, leaving the rest, take your stick, and dip it in the chocolate, insert it into the mug (make sure you don't push all the way through!) Wait about 15-20 seconds for chocolate melt to harden.
Dip your cakeball into the chocolate and don't swirl! Just rotate the stick until the entire ball is coated. Lift out and tap, while rotating the stick, to let the excess melt drip off.
Since my mugs had a lot of nooks and crannies, I took a toothpick and "scraped" out the excess melts so you could actually see the shape and handle on the pop.
 Now for the "beer foam" on top I used Wilton candy sprinkles in white. Along the theme of Booze-a-Palooza, I actually found that a shot glass was the perfect height and had the best diameter for dipping my beer mugs into the sprinkles without making a mess.
 After I got the hang of it, I was able to move quickly from scraping the excess chocolate and dipping into the sprinkles. For my first initial ones, where the chocolate harden before I had a chance, I just redipped the top part and then dipped into the sprinkles. I doubt anyone will complain about an extra layer of chocolate!
They ended being a huge hit!! Who says cake pops have to be round??
They ended being a huge hit!! Who says cake pops have to be round??


